0
0
New World Season 1: Ultimate Build Guides | Strategies for DPS, Tank, and Healer
In this section, we will discuss the best DPS build for Season 1 of New World. As a DPS player, your primary goal is to deal significant damage to enemies and contribute to the success of your group in expeditions or mutated expeditions. While individual play styles may vary, the builds we cover in this article are generally considered effective and are commonly used by experienced players.
↖ Best Tank Build
If you're interested in playing as a tank in your game, this build will provide you with the best tank build to optimize your effectiveness and survivability. The recommended build focuses on using a sword and shields as the primary weapons and a Warhammer as the secondary weapon. The build also utilizes heavy armour for increased durability.

Weapons:
- Sword and Tower Shield: The tower shield offers the highest block stability, allowing you to absorb more damage without depleting your stamina quickly.
- Warhammer: The Warhammer provides excellent crowd control abilities, such as stuns, slows, and knockdowns, which are crucial for disrupting enemies and protecting your teammates.
Armour:
- Heavy Armor: Choose heavy armour for its superior damage resistance and increased block stability. It also reduces the duration of crowd control effects and allows you to recover from being stunned or slowed more quickly.
Weapon Mastery (Sword and Shield)
- Leadership (Recommended for beginners): Provides a 30% damage reduction, allowing you to stay alive longer.
- Defensive Formation (Advanced option): Offers a 10% damage buff to you and your party members, enabling faster dungeon progression.
- Defenders Resolve: Enhances your taunting ability and provides damage reduction.
- Shield Rush (with Fortifying Shield Rush perk): A strong ability for engaging enemies and gaining additional fortify bonuses.
- Leaping Strike (or Reverse Stab): Leaping Strike allows you to reposition and handle ranged threats quickly. Reverse Stab reduces the cooldowns of your abilities.
- Aftershock (Ultimate): Provides extra slows to prevent enemies from escaping too quickly.
Weapon Mastery (Warhammer)
- Wrecking Ball (or Mighty Gavel): Wrecking Ball offers increased damage, while Mighty Gavel provides healing on hits.
- Shockwave (Non-negotiable): Acts as your taunt ability, ensuring enemies focus on you.
- Clear Out: Knocks down enemies instead of knocking them back, providing crowd control and granting a fortify bonus to you and nearby allies.
- Aftershock (Ultimate): Adds additional slows to hinder fast-moving enemies.
Attribute Allocation:
- Strength: Allocate points to strength for increased damage output and scaling with both the Warhammer and sword and shield.
- Constitution: Assign a significant number of points to the Constitution for improved durability and health.
- Dexterity: Allocate 50 points to dexterity for increased critical hit chance and additional benefits for the sword's scaling.
Gems and Hot Runes:
- Weapons: Use Carnelian gems to activate taunts and increase the threat by 300.
- Armour: Refer to a separate section at the end of the guide for gem and rune recommendations.
Perks:
- Weapons: Include perks such as Ward and Bane. Refer to a separate section at the end of the guide for further details.
- Armour: Recommended perks include Refreshing Move, Sundering Shockwave, and Fortifying Shield Rush.
- Jewelry: Focus on health, relevant protection, and the mentioned perks. See the section below for more information.
Additional Notes:
- Rings: Obtain the Simon Attack Silver Ring for its perks, including hearty slash damage and leaching, enhancing your survivability.
- Earrings: Aim for perks like Despised and Refreshing Toast, which help maintain enemy focus and increase potion usage, respectively.
This buildprovides you with a strong tank build for your gameplay. Remember to adapt and adjust the build based on your preferences and playstyle.
↖ Best Damage Build
This build will outline the recommended build for maximizing damage output in expeditions. The primary weapons for this build are the Great Sword and the Spear, although you can also use the Great Axe and Spear or Great Sword and Great Axe combinations. Two-handed melee weapons generally offer the highest DPS potential for expeditions.

Equipment Weight: Light or Medium
For a damage-focused build, it is recommended to use either light or medium equipment weight. Light equipment provides a 20-damage bonus and access to the powerful dodge roll, which is useful for evading mechanics. Medium equipment weight allows for a balance between damage and survivability. To achieve a medium-equipped load, you can use a heavy helmet, heavy chest, medium gloves, light legs, and medium boots. This combination maximizes armour while staying within the medium threshold.
Weapon Mastery:
For the Spear, the recommended perks are:
- Skewer: Applies to weaken, reducing the enemy's damage.
- Perforate: Applies to rend and weaken.
- Leg Sweep: Provides crowd control by knocking enemies down.
For the Great Sword, the recommended perks are:
- Relentless Rush: Deals damage and pairs well with the Relentless Freedom perk.
- Skyward Slash: Applies rend to increase damage.
- Roaring Rupture: Applies to weaken and can pull enemies together.
Attributes:
Recommended attribute distribution:
- Strength: 200
- Dexterity: 200
- Constitution: 100
Additional attribute points can be allocated to either strength or dexterity. Both the Spear and Great Sword scale off strength and dexterity, so investing in both is beneficial. Maintaining a minimum of 100 constitutions is recommended for survivability, although some players may choose to go lower.
Gems and Hot Rune:
-
Weapon Gems:
- Opal: Provides +15 damage when stamina is not full, easily achieved by dodging.
- Diamond: Provides extra damage when health is full and requires healer support.
- Armour Gems: Refer to the end of the video for gem recommendations and perks relevant to all builds.
- Hot Rune: Firestorm Heart Rune: Provides a damage boost and applies to weaken.
Perks:
-
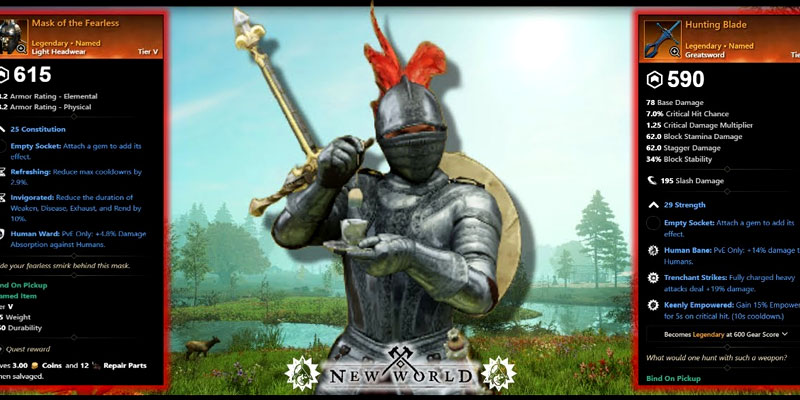
Weapon:
- Trenchant Strikes (Great Sword): Fully charged heavy attacks deal 20 extra damage.
- Infeebling Skewer (Spear): Applies to weaken, reducing the enemy's damage.
-
Armour:
- Relentless Freedom: Removes roots and slows, helpful against certain mutations.
- Fortifying Perforate (optional): Increases the fortifying effect from Perforate, improving tankiness.
- Bleeding Sweep (optional): Adds extra damage.
-
Jewelry:
- Rings: Gates Ring with Keen Slash Damage and Leeching III.
- Earrings: Beloved (reduces aggro) and Refreshing Toast (health regeneration).
This build focuses on maximizing damage output while maintaining some survivability. It utilizes the strengths of the Great Sword and Spear, applying weakened and rend debuffs to enemies and leveraging high-damage abilities. Remember to adapt the build based on your playstyle and the specific challenges you face in expeditions.
↖ Best Healer Build
The following is a guide for the best healer build in New World, focusing on the Life Staff and Void Gauntlet weapons. It includes recommended gear, abilities, attributes, gems, and perks.

Gear:
Light equipment load is recommended for maximum healing output. You can use a medium chest for slightly more armour while still maintaining a light equip load. The ideal setup is a light helmet, medium chest, light gloves, light legs, and light boots. The light equipment load provides a 30% outgoing healing buff, which is essential for healers.
Weapon Mastery:
- Sacred Ground is a must-have ability for increased healing. It should be used before fights to boost the effectiveness of other heals.
- Beacon and Orb are recommended abilities for AoE healing. Divine Embrace or Splash of Light can be alternatives to Orb.
- For the Void Gauntlet, the Void Blade ability is commonly used for dealing damage in the melee range. Scream is optional but useful in situations where enemies heal, such as in nature-based mutations or expeditions.
Attributes:
- Allocate 50 points into Intelligence for increased damage with the Void Gauntlet.
- Focus is the primary attribute of healers. Aim for 300+ points in Focus to maximize healing output.
- Consider putting around 130-140 points into Constitution for survivability. You can adjust this based on personal preference and playstyle.
Gems:
- Life Staff: Diamond is a must-have gem as it increases healing by 15.
- Void Gauntlet: Opal gem adds extra damage when dodging. Alternatively, use gems that correspond to enemy weaknesses. Topaz for Ancients (weak to lightning) or Sapphire for Corrupted (weak to arcane).
Heart Runes:
- Stone Form is a recommended heart rune for its defensive benefits, especially if the tank dies.
- Grasping Vines can be an alternative for support/utility purposes, as it applies to weaken and rend enemies.
Perks:
- Life Staff: Blessed and Refreshing Moves are essential. Blessed increases healing, while Refreshing Move reduces cooldowns when using light and heavy attacks.
- Void Gauntlet: Refreshing Move is recommended if using Void Blade. Putrifying Scream is useful for countering enemy healing in certain mutations or dungeons.
- Armour: Perks like Fortifying Sacred Ground, Keen Beacon, and Voracious Blade are suggested for increased healing, buffing allies, and lifestyle.
Jewelry:
Prioritize Health and Protection on all jewelry pieces for survivability.
- Gila Ring: Haughty (extra dodge), Sacred (increased outgoing healing), and optional Siphoning, Refreshing Evasion, or nature/void damage.
- Earring: Evasive or Beloved (less threat and increased healing after dodging) and optional Refreshing Toast or Healthy Toast for potion effectiveness.
This build provides a general overview of the best healer build in New World, including gear, abilities, attributes, gems, and perks. Adjustments can be made based on personal preferences, playstyle, and specific encounters.
↖ Ward, Bane, and Gems
In New World, certain perks and features can greatly enhance your chances of survival and effectiveness in expeditions. The following will focus on three important aspects: Ward, Bane, and Gems. Understanding and utilizing these elements will significantly improve your performance in different dungeon encounters. Let's dive into each one in detail.
Ward:
Ward is a perk in the game that can significantly increase your chances of survival in New World. While it is not necessary to have, it is highly recommended, especially as you progress to higher difficulties and face tougher enemies. Ward helps protect you from specific enemy types by reducing the damage they deal to you.
- When to Get Ward: You don't need to get Ward until you reach difficulty six or seven in terms of mutations. For normal gameplay or lower difficulties, the ward is optional.
- Choosing the Right Ward: The ward you select depends on the enemy types you will face in a particular expedition. To determine which ward you need, consult resources like the New World database, which provides information on enemy mob types in each expedition. For example, if you are facing human enemies, you will need Human Ward.
- Full Set of Wards: It is recommended to acquire a full set of wards for each expedition you undertake. This ensures maximum protection against the specific enemy types you will encounter.
Bane:
Bane is another important aspect of your build, specifically for tank and DPS roles. Bane allows you to enhance your weapons with additional damage against specific enemy types. However, the life staff, which is primarily a healing weapon, does not require bane.
- Choosing the Right Bane: Similar to Ward, the bane you select should align with the enemy type you will be facing in an expedition. Refer to resources or in-game information to determine which enemy types are present in each expedition.
Gems:
Gems play a role in increasing your resistance to elemental damage. Just like Ward and bane, choosing the appropriate gem for your armour is crucial in mutated expeditions, where certain elemental damage types become prominent.
- Researching Enemy Types: Before entering a dungeon, gather information about the enemy types present and the elemental damage they deal. Mutated expeditions, such as Imperium Forge and Starstone Barrows, introduce specific elemental mutations.
- Gem Selection: Select gems that provide absorption against the elemental damage types you will face. For example, if you are entering an expedition with a nature mutation, choose a gem that provides nature damage absorption. Pristine aquamarine is recommended for ice damage absorption, pristine amber for nature damage absorption, ruby for fire damage absorption, and amethyst for void damage absorption.
- Amulets: Consider crafting or acquiring amulets with corresponding protection gems further to enhance your resistance against specific elemental damage types. Matching the gem with the protection it offers can provide additional advantages.
- Flexibility: When selecting gems, it can be helpful to choose ones with constitution bonuses. This allows you to use the same gems across different builds, such as tank, DPS, or healer, that require some constitution investment.
Remember, if you still need to figure out ward, bane, or gem selection, seek further clarification through comments or additional resources. Understanding these mechanics is crucial for successful group content and mutated expeditions.
Conclusion:
This article provides detailed guides for the best DPS build, tank build, damage build, and healer build in New World's Season 1. It's important to note that these New World builds and recommendations serve as a starting point and can be adjusted based on individual playstyles and preferences. Adaptation and customization are encouraged to optimize gameplay experiences.
Most Popular Posts
- What is the best perk choice for each artifact in New World?
- 4 Powerful Flail Builds For PVE and PVP in New World
- Top 3 Best Solo Builds For Weapon Combos in New World Season 3
- Top 3 Best Rapier Builds For PvP and PvE in Season 3 | New World
- New World Expansion Best DPS Builds For PVP and PVE: Greatsword and Spear
- New World Season 3 Fire Staff Great Axe Builds Guide: Dominating The PVP Scene
Popular Category Lists
- Path of Exile / (873)
- Diablo IV / (702)
- Runescape / (344)
- New World / (172)
- WoW Classic SoD / (171)
- Guild Wars 2 / (159)
- Elder Scrolls Online / (138)
- FFXIV / (135)
- World of Warcraft / (65)
- WOW Classic / (43)
- Elden Ring / (40)
- Throne and Liberty / (36)
- SWTOR / (35)
- Albion / (35)
- Last Epoch / (32)
- League of Legends / (30)
- Dark and Darker / (28)
- Fallout 76 / (27)
- WotLK Classic / (23)
- Genshin Impact / (22)