0
0
ESO Arcanist Builds: Strength and Tanks to dominate the secret of the battlefield
- Eliza
- Share
- Elder Scrolls Online
- 05/17/23
- 7040
Welcome to our Arcanist Tank build guide for The Elder Scrolls Online! In this guide, we will explore the mystical arts of tanking and uncover the secrets of harnessing arcane power to protect and dominate the battlefield. Get ready to witness the unstoppable force of our Arcanist Tank build in action. But first, let's understand why you should play an Arcanist Tank.
- Why Play an Arcanist Tank?
- Strengths
- Weaknesses:
- Group Buffs
- Race
- Stats & Attributes
- Food
- Potions
- Mundus
- Gear
- Traits & Enchants
- Optional Gear
- Skills
- Ultimate
- Passives & Other Skills
- Combat Strategy
- Crux
- Champion Points
↖ Why Play an Arcanist Tank?
Arcanist Tanks offer a unique playstyle that combines the power of the arcane with the durability of a tank. By utilizing special skills and abilities, you can provide powerful group buffs, maintain high survivability, and contribute to the overall damage output of your group. Whether you're engaging in trials or dunge
↖ Strengths
- Group Utility: Arcanist Tanks provide a lot of group benefits, including group buffs and enemy debuffs. They offer significant group utility, making them valuable assets in group content.
- Sustain: With high amounts of recovery, Arcanist Tanks have good sustain, making it easier to manage resources during battles.
- Survival: Arcanist Tanks have excellent survival capabilities with two heals and a massive damage shield. These defensive tools allow them to withstand heavy damage and stay in the fight.
- Long Duration Abilities: The build utilizes many long-duration abilities, making it easy to maintain buffs and debuffs throughout the battle.
- Resistance Cap: Arcanist Tanks can easily reach the resistance cap, ensuring they take reduced damage from enemies.
- Defensive Benefits: The build offers various defensive benefits, enhancing your survivability and mitigating damage effectively.
↖ Weaknesses:
- Overlapping Group Benefits: Some of the group benefits provided by the Arcanist Tank overlap with other skills and classes. While they are unique to the Arcanist, similar effects can be obtained through other means.
- Forced Main Tank Role: The main unique group buff is tied to a taunt, which requires you to play as a main tank. This limitation may not suit your preferred playstyle if you wanted to focus on other roles.
- Stamina Scaling Skills: Some initial useful skills in the build scale with stamina, which may not be optimal for tanking if you don't have sustained stamina resource management.
↖ Group Buffs
Arcanist Tanks offer a plethora of group benefits, including:
- Runic Sunder (2200 Armor Penetration)
- Fate-Woven Armor (AOE Minor Breach)
- Runic Defense (Group Minor Resolve)
- Rune of the Colossus (Group Minor Brittle and Minor Vulnerability)
- Circumvented Fate (Group Minor Evasion)
- Arcanist Domain (Group Minor Courage, Minor Fortitude, Minor Intellect, Minor Endurance)
- Vitalizing Glyphic Ultimate (Group Heal, 200 Weapon and Spell Damage)
These group buffs make the Arcanist Tank a valuable addition to any group.
↖ Race
For this Arcanist Tank build, we recommend the Nord race. The increased resistances provided by Nords make it easy to reach the resistance cap. Combining the Nord's racial bonuses with Runic Sunder and Trauma scales, you won't necessarily need gear sets that provide penetration.

Additionally, Nords offer bonuses to max stamina, ultimate gain, max health, and frost resistance. While other races can be viable, the Nord race aligns well with the build's focus on resistances and survivability.
↖ Stats & Attributes
To begin, let's take a look at the attribute distribution for this build. Wehave set 15 points into Magicka, 34 points into Health, and 15 points into Stamina. Feel free to customize these attributes according to your preferences. The chosen attribute distribution works well with the jewelry and food Wehave selected. However, you can make slight adjustments to suit your own playstyle.
With this build, we have a good balance of all three recoveries and high resistances. Here are the advanced stats for the character, assuming the usage of Azoger's Red Froth drink.
↖ Food
For the food, you can opt for Bewitched Sugar Skulls, as this build already has good recoveries. You can also make some modifications to your setup by using Harmony jewelry alongside Sugar Skulls to boost your max stats.
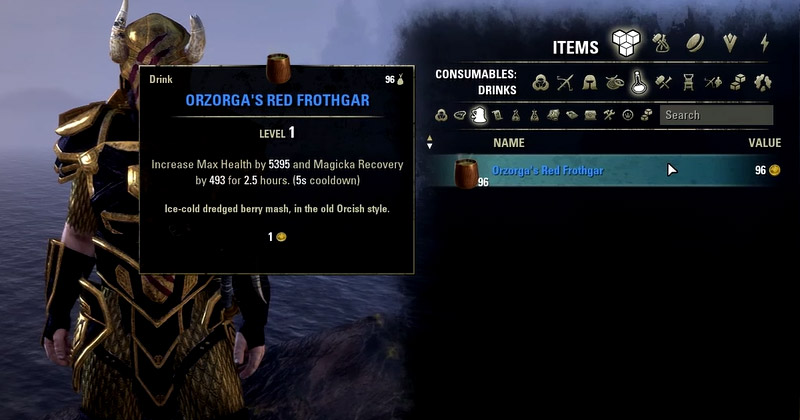
Keep in mind that having higher max stats is crucial, as it ensures you gain the full benefit when acquiring resources from your Harmony effect. Alternatively, you can use Smoked Bear to further increase your recoveries.
↖ Potions
In terms of potions, Werecommend using Tri-Restoration Potions for this build. These potions provide all recoveries and restore all resources, offering great utility during battles. If you prefer, you can also consider using Minor Heroism Potions.
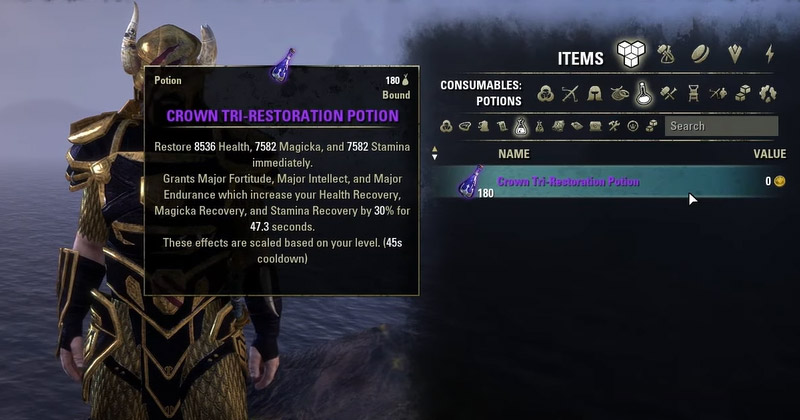
However, given the skill choices and relevant gear, Wefind that Wealready have sufficient Heroism gain and, therefore, do not require the use of Minor Heroism Potions. Feel free to adjust your potion choice based on your playstyle.
↖ Mundus
For the Mundus Stone, Werecommend choosing the Atronach Mundus for increased Magicka recovery. This is crucial because our build heavily relies on Magicka-based skills. With this setup, let's now delve into the gear options, as there are two different setups available.
↖ Gear
For the Arcanist tank build, we have three gear setups: one for ad pulls in dungeons, one for boss encounters in dungeons, and adjustments for trial Arcanist tanks.
Ad Pulls (Dungeons):
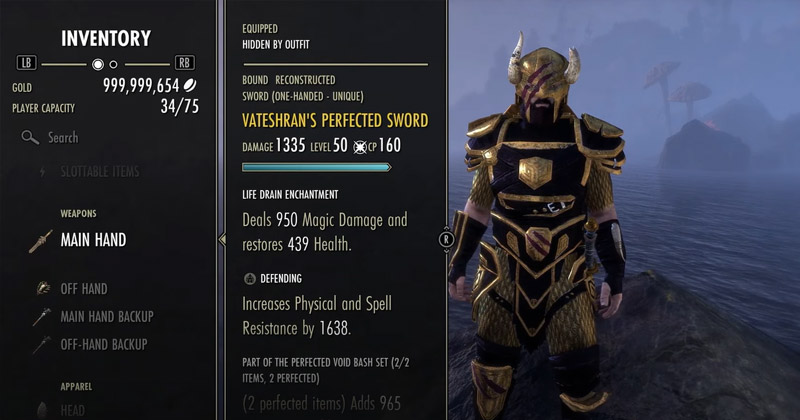
- Vateshran Hollows (Sword and Shield): The Void Bash set is essential for ad pulls as it allows you to quickly and sustainably pull enemies in with one button press. The perfected version provides increased max health and applies an AoE Major Maim debuff to enemies, reducing their damage.
- Powerful Assault (Charge Staff): This set provides max health, max stamina, and weapon/spell damage. When combined with Caltrops on the back bar, it offers a group utility of increased armor penetration (major breach), allowing your group to wear more medium armor and deal more damage.
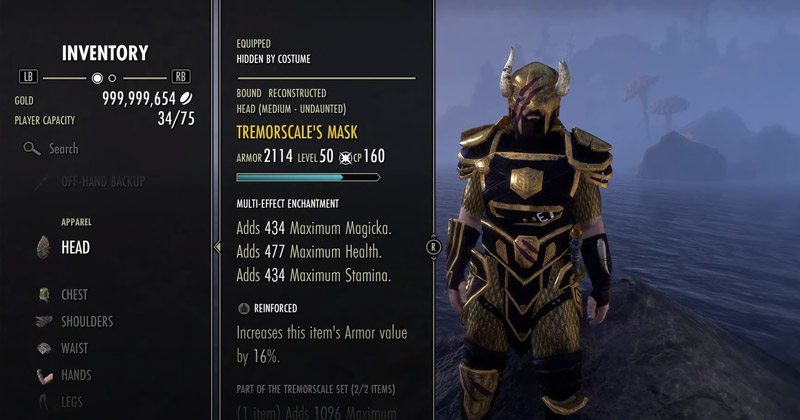
- Tremorscale: This set grants max stamina and triggers a Dune Ripper to burst from the ground when you activate a taunt ability, reducing the armor of enemies within 4 meters. Combined with Runic Sunder (another armor debuff), this offers a significant amount of group penetration with just two gear pieces.
- Turning Tide: This set provides max health, max stamina, and an additional 10% damage increase for your group when you block. It is excellent for dungeon content and can be obtained from normal dungeons.
Boss Encounters (Dungeons):
- Maelstrom Perfected Sword and Shield: The Rampaging Slash set is used for boss encounters. While it may not be the best option, it offers additional recovery and a resource restoration effect when using low slash and fully charged heavy attacks.
- Infused Crusher Eye Staff: This trait and enchantment combination is effective for boss fights, as you can reliably apply the enchantment to a specific enemy. It reduces the target's armor, making them more vulnerable to your group's attacks.
↖ Traits & Enchants
- Gear Traits: Alternate between Reinforced and Divines traits. Reinforced can help reach the resistance cap and amplify the effectiveness of Tremorscale, reducing incoming damage. Divines traits provide extra damage reduction and safety, as well as boost the Puncturing Remedy set.
- Jewelry Traits: Harmony with Tri-Stat Reduction is recommended for organized groups or players who know what they're doing. It works well in both trial and dungeon content. If your group lacks coordination, Infused traits may be better suited for your needs.
- Enchants: Use Tri-Stat enchants on gear for the highest overall max stats. This will boost your health, stamina, and magicka, providing a balanced approach to tanking.
Note: If you're not using the Powerful Assault set, you can consider using different jewelry traits such as Magicka Cost Reduction or additional Recovery if you prefer to keep your resources high.
↖ Optional Gear
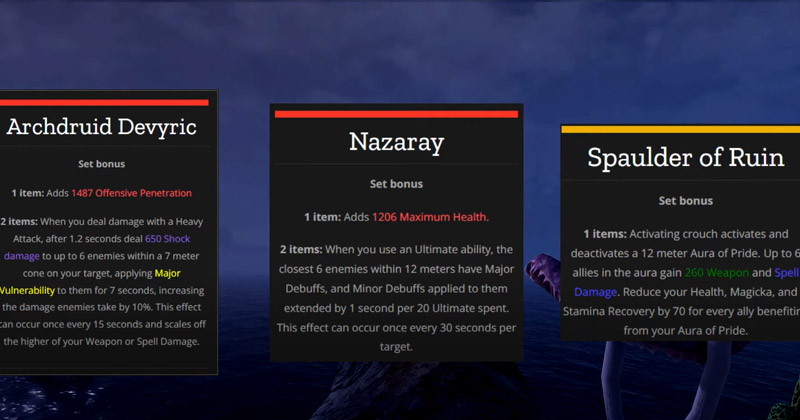
When it comes to gear options for this build, there are several choices depending on the content you plan to tackle. In trial content, you will likely be the main tank, so you have a few options for gear sets. Tremorscale is a popular monster set, but you can also consider sets like Archdruid Nazareth or ESO mythic items such as Spoiler's Ruin.
In this build, we recommend using Powerful Assault and Turning Tide sets. Other viable options include Pearlescent Ward, Saxhleel Champion with Resonating Glyphic, Crimson Oath (if not using Tremorscale), and Vestment of Olorime if you don't have a healer providing Major Courage or Drake's Rush. Additionally, if you want to boost your ultimate generation, consider using the Crimson Oath set. Keep in mind the specific needs of your group and adjust your gear accordingly.
↖ Skills
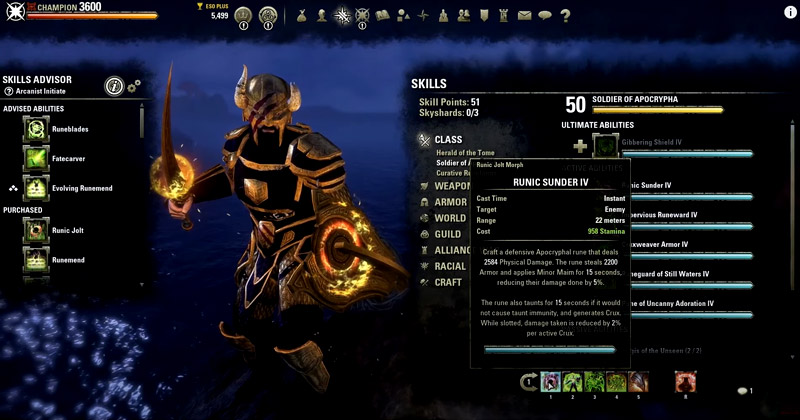
- Runic Sunder: This skill replaces Pierce Armor as your primary stamina taunt. It has a range of 22 meters and provides a unique group buff. When applied to enemies, it reduces their armor by 2,200, granting your group increased damage. This skill is effective in both trials and dungeons, allowing you to use alternative five-piece gear options. Additionally, using Runic Sunder with Tremorscale set grants Minor Maim and generates Crux, which is beneficial for your survival.
- Xen's Empowering Disc: This skill provides various group benefits and should be slotted on your front bar. The Empowering Disc morph grants Minor Courage, Minor Fortitude, Minor Intellect, and Minor Endurance to you and your allies for up to 10 seconds after leaving the vortex. It offers reliable group buffs and can be utilized even in trials where movement is required.
- Impoverish Rune Ward: This skill is a reactive tank skill that requires anticipation of incoming damage. It provides a damage shield that absorbs 31,275 damage for one second and 18,764 damage for five seconds if the first shield persists. The shield scales off your max health, making it even more potent if you allocate your points into max health. The skill also retaliates with magic damage to the attacker and heals you for 4,117 health per consumed Crux. This skill enhances survivability by preventing damage and offering self-healing.
- Rune Guard of Still Waters: This skill serves as one of your main heals. The morph chosen provides minor resolve for 20 seconds, increasing your armor and granting it to your group. It also immobilizes enemies within a 7-meter radius for three seconds, offers minor protection, and automatically heals you for 12,352 health when damaged below 50% health. Combining this skill with Impoverish Rune Ward ensures survivability and consistent healing.
- Flex Slot: Power Bash with Void Bash is essential for utilizing the Void Bash set. It is recommended for add pulls but should be replaced for trial situations and boss fights. Another option is using the Maelstrom one-handed shield with Heroic Slash to gain minor heroism and enhance ultimate gain.
↖ Ultimate
Replenishing Barrier: This ultimate is chosen for increased magicka recovery, which synergizes with the Magicka 8 passive that boosts recovery by 10%. Alternatively, you can slot Goliath's Shield to maximize overall recovery of health, magicka, and stamina per ability if sustaining magicka becomes an issue.
Back Bar (Add Pull Setup):
- Pulsar: This skill applies Minor Mangle, reducing the max health of enemies. It also procs Minor Brittle and Minor Maim, providing additional benefits layered on enemies.
- Razor Caltrops: Use this skill to activate the Powerful Assault set and apply a snare to enemies. It also grants Major Breach, which is essential since you do not have Pierce Armor in your build.
- Blockade of Frost: This skill activates your enchantment, grants Minor Breach to chilled enemies in the area, and provides a damage shield. Ensure enemies are within the blockade to maximize the uptime of Minor Breach.
- Crystallized Slab: This skill provides Major Resolve and generates Crux.
↖ Passives & Other Skills
When it comes to passives and other skills, there are several key considerations for the Arcanist Tank build. Let's take a closer look:
- Herald of the Tom Skill Line: While the passives in this skill line are primarily damage-based, the Herald of the Tom skill provides additional magical and stamina resources, which can be helpful for sustaining your abilities. It also grants resource returns whenever you use a class skill, aiding in resource management.
- Rune of Displacement: This skill, despite its potential for tanking, has limited effectiveness due to its small radius and range. It is recommended to prioritize the Void Bash set over trying to incorporate this skill into your build.
- Soldier of Apocrypha Skill Line: The passives in this skill line, such as Aegis of the Unseen and Wellspring of the Abyss, offer increased armor and recovery, respectively. These passives provide valuable defensive and sustain benefits that enhance your overall tanking capabilities.
- Circa Convented Fate: This skill offers a group buff called Minor Evasion, reducing area-of-effect damage by 10%. While its usefulness may vary depending on the content, it can be particularly beneficial in encounters with high AOE damage.
- Healer Skill Line: Some skills in the Healer skill line, such as Rune Mend and Chakram Shields, are not optimal for tanking as they cost stamina. However, Resonating Glyphic can be a valuable ultimate skill, summoning the Apocryphoglyphic to provide a weapon and spell damage buff while healing you and your allies. Pairing it with the Sax Champion set can maximize its effectiveness.
Passives such as Mastery of Weaving Fate and Abysmal Water significantly increase your damage output for each active crux, making them crucial for the build. Additionally, the passive that restores magical and stamina resources upon generating crux provides further sustain options. Another notable passive grants a substantial increase in magicka and stamina recovery, stacking on top of the already high sustain provided by the tank skill line.
Basic Skill Rotation
- Pre-Buff: Begin by activating your armor buffs to enhance your defensive capabilities before engaging in combat.
- Runic Sunder: Initiate combat by using Runic Sunder, a skill that deals damage and provides benefits to your group. Place the skill on the ground so your group members can benefit from it.
- Heroic Slash and Maelstrom 100 Shield: Use Heroic Slash in conjunction with the Maelstrom 100 Shield, followed by a heavy attack on your back bar.
- Frost Clench and Caltrops: Maintain a 100% uptime on Frost Clench and ensure that Caltrops are consistently applied to enemies.
- Blockade: Continuously use Blockade to deal damage and apply its effects to enemies.
- Shield Skill: Utilize your shield skill whenever necessary for additional defense.
- Runic Thunder: Runic Thunder generates Crux every time it is cast. Collect these Crux icons and use them to activate your powerful healing ability, which provides both a substantial heal and additional protection through a damage shield.
↖ Combat Strategy
- Frost Block: Initiate combat by using Frost Block to draw enemy attention.
- Caltrops: Deploy Caltrops to damage enemies and apply crowd control effects.
- Void Bash: Use Void Bash to pull enemies toward you, setting them up for further skill applications.
- Pulsar: Continuously spam Pulsar to apply debuffs to enemies.
- Charm Skill: If there are ranged enemies, use your Charm skill to pull them closer for better control and damage potential.
↖ Crux
Understanding Crux
Crux is a vital resource for an Arcanist Tank. It consists of Crux Earners and Crux Spenders. As a tank, it is generally more beneficial to focus on Crux Earners rather than Crux Spenders. However, for healing purposes, utilizing a Crux Spender can be advantageous.
- Runic Sunder: This skill generates Crux and serves as your primary Crux Spender, healing you in the process. The heal scales with the number of Crux stacked, reaching its maximum potential at three Crux.
- Cruxweaver Armor: To earn Crux, equip Cruxweaver Armor, which generates Crux every five seconds or when you take damage. The alternative morph of this skill offers block mitigation, but the small amount makes it less reliable.
Managing Crux:
It is recommended to focus on a single Crux Spender to avoid complications. Using multiple spenders can lead to difficulties in tracking and maximizing the benefits. The morph of Impervious Rune Ward is suggested due to its frequent usage, but choosing the other morph for Fasalla's Guile Armor may also work. However, using more than one spender can result in unreliable or reduced benefits.
↖ Champion Points
Let's take a closer look at the Champion Points. There are several options you can consider for your champion points allocation. Here are some recommendations:
Red Champion Points:
- Duelist: This provides additional protection against direct damage, making you more resilient on the battlefield.
- Rebuff: This helps to mitigate damage over time effects and provides increased survivability.
- Enduring Resolve Ball: Grants damage reduction while you have a damage shield active.
- Ironclad: Offers damage reduction from direct attacks.
- Unassailable: While less effective than the other options, it can be useful against certain AoE attacks. However, it may not be necessary in most situations.
Blue Champion Points:
- Balanced Vitality: Increases your health recovery, allowing you to sustain your health pool more effectively.
- Shield Master: Enhances the strength of your damage shield, reducing the damage taken.
- Bastion: Further increases the effectiveness of your damage shield.
- Ward Master: If you prefer to focus on blocking and damage shield mechanics, this can be a valuable choice, as it reduces incoming damage when you have a damage shield active.
Other options to consider:
- Celebrity: Useful for engaging in add pulls or situations where mobility is important. Swap with Bracing Anchor to move faster.
- Bracing Anchor: Slows you down but can provide benefits in certain situations.
- Adjust your champion points based on the encounter and specific fight mechanics to maximize your survivability.
Remember, the champion point allocation may vary depending on your playstyle and the situation you're facing. It's important to adjust your champion points accordingly to optimize your tanking capabilities.
Conclusion:
the Arcanist Tank Build offers a unique playstyle that combines the power of arcane magic with tanking abilities. Whether you're delving into dungeons or engaging in group content, this build will provide you with the tools to succeed.
Most Popular Posts
- ESO Bastion Nymic Guide: How to Conquer New World Event in Necrom Chapter?
- How do players choose the best PVP set after The Elder Scrolls Online latest patch?
- Which are the Best Elder Scrolls Online Solo Class in 2023?
- ESO Necrom Chapter Launch: How to start this epic adventure?
- ESO Endless Dungeon: Everything You Need to Know
- ESO (2023) Guide: Most Efficient Way To Farm Gold For Beginners
Popular Category Lists
- Path of Exile / (873)
- Diablo IV / (702)
- Runescape / (344)
- New World / (172)
- WoW Classic SoD / (171)
- Guild Wars 2 / (159)
- Elder Scrolls Online / (138)
- FFXIV / (135)
- World of Warcraft / (65)
- WOW Classic / (43)
- Elden Ring / (40)
- Throne and Liberty / (36)
- SWTOR / (35)
- Albion / (35)
- Last Epoch / (32)
- League of Legends / (30)
- Dark and Darker / (28)
- Fallout 76 / (27)
- WotLK Classic / (23)
- Genshin Impact / (22)