0
0
POE 3.22 Ball Lightning Totem Hierophant Builds: Budget Friendly, Single Target and Area Damage
- Logan
- Share
- Path of Exile
- 08/16/23
- 5068
Welcome, Exiles! In this guide, we'll delve into the exciting world of Ball Lightning Totems, a powerful and versatile choice for league starters in Path of Exile 3.22 update. The synergy between Ball Lightning and the Hierophant's Mana-based mechanics creates a highly effective and budget-friendly build that can carry you through the early game all the way to endgame content. In essence, this build is a great option for those fond of spell totems, despite certain drawbacks.
- History of Spell Totems
- Soul Mantle Mechanics
- Mana Stacking
- Ball Lightning
- Ascendancy & Defensive
- Map Showcase
- Item Setup
- Gem Setup
- Passive Tree:
- Leveling
- Conclusion & Thoughts
Buget PoB Links: https://pobb.in/Av2jXcMGaemD
↖ History of Spell Totems
Before delving into the build itself, a brief history of spell totems is necessary. Spell totems were once a staple for new players, allowing various spell skills to be used effectively. They provided diverse gameplay experiences and were capable of completing the game with varying degrees of success.
In patch 3.15, the Forbidden Rite league introduced a game-changing mechanic, causing totem HP to matter significantly due to its interaction with chaos damage. This led to incredibly powerful league starters with massive damage potential. However, in patch 3.16, totem HP was nerfed, particularly affecting the power of spell totems. The Soul Mantle item also lost its +1 maximum totem, further weakening the build's viability.
↖ Soul Mantle Mechanics
Soul Mantle, a previously overpowered item, underwent changes that impacted spell totem builds. It grants curses upon totem summoning, with a maximum of nine curses possible. The significant benefit is the Self-Flagellation jewel, providing up to 180% increased damage based on the number of curses on the player. This makes it a formidable source of damage. The Asylum cluster on the passive tree, combined with the Kikazaru ring, contributes to reduced curse effects, achieving a balance between curse power and immunity.
↖ Mana Stacking
The build utilizes a semi-Mana stacking strategy for King's Cloak, Mind over Matter, and Divine Guidance for defense. With this approach, incoming damage is divided between life and mana, offering a substantial effective health pool (EHP). The Arcane Cloak skill enhances damage by utilizing mana and provides a considerable damage boost. The Ritual of Awakening ascendancy, combined with totem count, adds substantial life and mana regeneration. This setup prioritizes balanced EHP over extreme mana stacking and promotes a safer playstyle without neglecting life.
↖ Ball Lightning
Ball Lightning Mechanics:
- Ball Lightning is a lightning skill that strikes enemies within its area of effect every 150 milliseconds.
- The skill has projectile behaviour, but its projectiles do not "shotgun" (meaning multiple projectiles won't hit a single enemy simultaneously).
- The damage of Ball Lightning can be increased by increasing its area of effect (AOE) and by controlling its projectile travel speed.
Area of Effect (AOE) Importance:
- Increasing AOE helps Ball Lightning hit enemies more frequently while they are within its area of effect.
- Slower Projectiles support the skill's damage output by causing Ball Lightning to stay in the same area longer, resulting in more ticks of damage on an enemy.
- Sanctuary of Thought (obtained from Uber Lab) can provide up to 100% increased AOE, which significantly boosts Ball Lightning's effectiveness.
Placing Totems and AOE Optimization:
- Placing totems for Ball Lightning optimally is crucial for maximizing damage output.
- Placing a totem directly on top of an enemy reduces the damage potential because the skill starts slightly ahead of the enemy and doesn't utilize the full travel time of the projectiles.
- To maximize damage, you should place the totem slightly behind the enemy, allowing the Ball Lightning projectiles to travel through the enemy and deal more ticks of damage.
This strategy helps you get more hits on the target, increasing overall damage output. It's important to consider the combination of AOE, projectile speed, and totem placement for the most efficient use of the Ball Lightning skill in both single-target and area-clear scenarios.
↖ Ascendancy & Defensive
Ascendancy Choices
- Herofant Ascendancy is favored, especially for totem builds.
- Pursuit of Faith grants +1 totem and placement speed, which greatly improves totem placement.
- Ritual of Awakening provides increased damage, substantial Mana regeneration, and Life regeneration.
- Conviction of Power might be useful for crit builds, but Elemental Overload is preferred for non-crit builds due to its substantial damage boost.
- Elemental damage with non-critical strikes becomes "lucky," leading to increased damage potential.
- Lightning module specifically benefits lightning skills, enhancing damage output.
Notable Ascendancy Nodes
- Pursuit of Faith: +1 totem and placement speed.
- Ritual of Awakening: Increased damage, Mana and Life regeneration.
- Elemental Overload: Provides substantial damage without relying on critical strikes.
- Divine Guidance: Transfiguration of Mind for increased damage and defenses.
- Sanctuary of Thought: Offers increased maximum Energy Shield and reduced totem Mana cost.
- Increased area of effect per 50 reserved maximum Mana is also mentioned.
Defensive Choices
- Mono-stacking with non-crit is preferred for this build due to various benefits.
- Defenses are challenging to incorporate into spell totem builds, especially without going monostacker.
- Elemental Overload is a significant incentive for not going crit.
- Defenses are important, particularly for hardcore playstyles.
- To mitigate squishiness, the build incorporates a large amount of effective hit points (EHP).
- Armor, spell suppression, and evasion are limited due to build constraints.
- Evasion is low, with reliance on a Jade Flask and gear choices for mitigation.
- Block chance is also low, and additional investment might compromise damage potential.
- Overall survivability is described as "okay," with room for adjustments.
- High regeneration and recovery are standout defenses.
- Surprisingly resilient against damage over time (DoT) effects due to the raw HP pool and region.
- DoT cap pool is emphasized, making the character less vulnerable to DoTs.
↖ Map Showcase
With 5000 Mana, you gain 100 increased Airway. Here's a quick demonstration using a Minotaur map to showcase the build. While mapping, you'll place two totems using Multiple Totem Support. Shield charge around, placing totems and using Arcanist Brand for auras like Sniper's Mark and Purifying Flame for damage boost.
Eternal Blessing lets you reserve one Aura for free. In maps, totems melt enemies behind you, or you can strategically place them ahead. In boss fights, use Sigil of Power for damage and defense, remembering you don't have to stand in the circle. More complex than Ballista builds, requiring precise totem placement, Digital Power usage, and button presses.
↖ Item Setup
- Totems and Stats: Totems inherit your stats from items.
- Cosmetics: Celestial Ball Lightning is a fun and beautiful MTX option.
- Soul Mantle: Invested in Soul Mantle for +2 totems. It costs around 2-3 divines to craft. Vital for the build.
- Helmet: Additional projectile crucial for mapping behavior. Clear improves with more projectiles.
- The Shield: Combined +2 minimum frenzy charges and +1 summon totem charges with Awakener's Orb. Offers damage, cast speed, and attack speed.
- Boots: Movement speed, regen, and life important. Craft options considered.
- Stygian Vise: Focused on reduced flask charges used, life, and mana.
- Gloves: Lightning exposure on hit is important. Life, mana, and resistances, as always.
- Chest: Used a modestly crafted chest. For now, room for improvement.
- Rings: Kikazaru ring with quality for Caster. Cluster for curse reduction. Avoid being immune for self-flagellation benefits.
- Amulet: Opted for life, mana, resists over +1 lightning due to budget constraints.
- Flasks: Various flasks with evasion, cast speed, chaos res, and movement speed. Placeholder for Taste of Hate.
- Survival Flasks: Swap in life and mana flasks for survivability against invasions.
↖ Gem Setup
For Ball Lightning, essential links are Ball Lightning - Multiple Totems - Slower Projectiles. Avoid Faster Projectiles for higher damage. Use Elemental Focus for damage, and if non-crit, Cruelty is a strong option. Arcane Surge boosts damage via Arcane Cloak. Conductivity aids single-target. Eternal Blessing provides free Wrath. Other slots flexible.
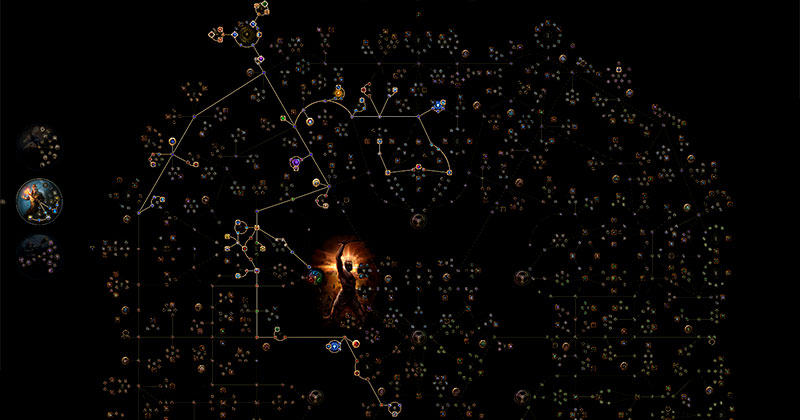
↖ Passive Tree:
Prioritize life, mana, and AoE. Skip area damage. Dynamo provides guard skill benefits. Reach 5000 Mana for ascendancy peak. Ancestral Bond key. Primal Manifestation preferred over taunt. Scintillating Idea notable on cluster Jewel. Sleepless Entries for Onslaught. Lightning damage with non-crits and Prodigal Perfection essential. Snaring Spirits or other damage nodes work.
↖ Leveling
Next, we will focus on the leveling process, skill progression, and important nodes to pick up on the passive tree.
Early Levels (1-30)
- Skill Choice: Start with Spark. Spark is highly effective for early leveling due to its strong damage and coverage. As an alternative, you can consider using Holy Flame Totem in combination with Flame Wall or Cremation.
- Skill Links: For Spark, prioritize links such as Spark - Pierce - Onslaught. As you gain more links, add Faster Casting and, later, Lightning Penetration.
- Passive Tree: Allocate damage and cast speed nodes, prioritizing the nodes that enhance your chosen skill(s).
Transitioning to Totems (30-40)
- Ancestral Bond: Around level 30, you can access the Ancestral Bond keystone. This is when you consider transitioning to totem-based gameplay.
- Totem Choice: Start with Spark Totems. They are effective and relatively easy to level with.
- Notable Passives: Prioritize passive nodes that enhance totem damage, cast speed, and elemental damage.
Scaling Totem Damage (40-60)
- Increased Area of Effect: For Ball Lightning Totems, wait until you have enough area of effect (AOE) nodes before transitioning. Ball Lightning requires more AOE to be effective.
- Ball Lightning Totems: If you're transitioning to Ball Lightning Totems, focus on nodes that increase AOE, cast speed, and elemental damage.
- Important Passives: Consider nodes like Precision (for Dexterity), Arcanist Dominion, Lightning Walker, and Cruel Preparation (for life).
Mid-Game (60-80)
- Enhancing Survivability: Focus on acquiring life nodes and survivability on the passive tree. Prioritize nodes like Heart and Soul, Mental Rapidity, Crackling Speed, and the Sliding Mastery cluster.
- Elemental Overload: Obtain Elemental Overload for a substantial damage boost.
- Choosing a Path: Decide whether you want to go for Spark Totems or Ball Lightning Totems based on your AOE and playstyle preferences.
Late-Game (80+)
- Sanctuary of Thought: Around level 82, aim to acquire the Sanctuary of Thought notable. This is a significant multiplier for your damage output.
- Totem Setup: Fully optimize your totem setup by obtaining key support gems and damage-enhancing nodes.
- Endgame Transition: Once you reach this point, you can start transitioning into the final version of your passive tree. Pick up more damage, totem-related, and mana-related nodes.
↖ Conclusion & Thoughts
Spell totems remain effective, evident from its successful performance across various challenges. While it provided a comfortable experience, we wouldn't label it as top-tier due to some notable shortcomings. Mainly, the defensive aspect needs to be improved, particularly in positioning on the skill tree and pathing. While the HP stats seem impressive on paper, acquiring robust defensive layers, especially on the right side of the tree, demands significant investment and compromises on damage potential. The issue of balancing defense and offense is pronounced, as block and evasion mechanisms are more challenging to attain.
The build's strength derives from the synergy with ballista setups, which easily surpasses the limitations of traditional ballista builds in terms of placement and damage delay. However, a learning curve exists for efficient skill placement. It's worth noting that the potential for spell totems needs to be fully tapped; innovative spell releases may rejuvenate this playstyle. In essence, this build is a great option for those fond of spell totems, despite certain drawbacks.
Most Popular Posts
- Poe 3.21 Builds | Crucible League Starter & EndGames Builds
- Top 5 Best Ways to Get 6-Link Easily and Efficiently in POE 3.21
- PoE 3.21 Boneshatter Juggernaut League Starter Build
- POE 3.21 Arc Lightning Hierophant League Starter Build
- POE 3.21 Ultimate Forged Frostbearer Raise Spectre Necromancer Build | 100+M DPS
- How to Succeed in Path of Exile Ruthless Mode?
Popular Category Lists
- Path of Exile / (873)
- Diablo IV / (702)
- Runescape / (344)
- New World / (172)
- WoW Classic SoD / (171)
- Guild Wars 2 / (159)
- Elder Scrolls Online / (138)
- FFXIV / (135)
- World of Warcraft / (65)
- WOW Classic / (43)
- Elden Ring / (40)
- Throne and Liberty / (36)
- SWTOR / (35)
- Albion / (35)
- Last Epoch / (32)
- League of Legends / (30)
- Dark and Darker / (28)
- Fallout 76 / (27)
- WotLK Classic / (23)
- Genshin Impact / (22)