0
0
FFXIV Containment Bay Z1T9: Zurvan (Unreal) Fight Guide
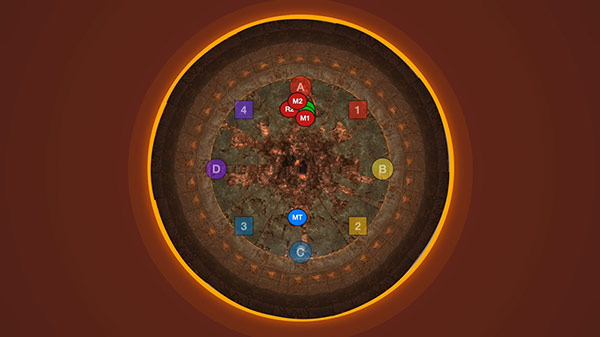
This guide provides a walkthrough for the Zurvan (Unreal) fight in Final Fantasy XIV Containment Bay Z1T9. Please note that this guide is based on the extreme version of the fight, and there may be slight differences between this guide and the Unreal version upon release. Ensure that your group has agreed on clock spots in advance, with tanks positioned north and south, healers positioned east and west, and a DPS on each intercardinal.
↖ Phase 1
At the start of the fight, there are some mechanics that will be applied later on, such as Soar. Position your main tank opposite the middle of the arena where the boss is located. The main tank should face away from the boss to avoid taking heavy damage from metal cutter attacks. Tanks can freely use their cooldowns since there are no tank busters in this phase.
The rest of the party should stack up near the southeast corner of the arena. After a few auto attacks, the boss will cause the entire east quadrant of the arena to disappear and cast Flare Star, which creates puddles beneath each player. Move as a group to dodge the puddles, and then everyone except the main tank can move back to their original positions. The main tank will continue to deal with cleaving autos while the stage crumbles away, one quadrant at a time (east, north and west, then south).
There will be one more Flare Star. Stacking near two instead of three helps the main tank dodge its Flare Star and reach the final quadrant more easily. Once everyone is in the same quadrant, there are no further mechanics in this phase. Together, there are no more metal cutter auto attacks to worry about. The stage crumbles completely, and the fight enters the next phase.
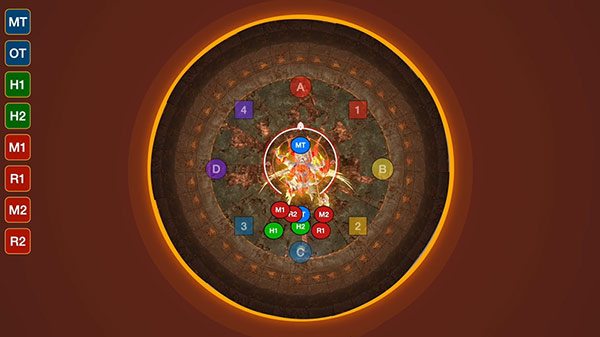
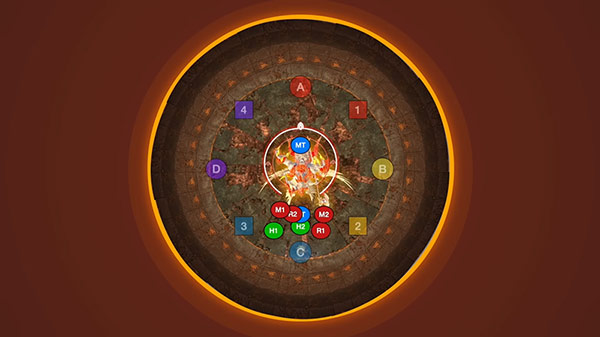
↖ Phase 2
At the beginning of this phase, have your main tank move north while the rest of the party positions slightly south. The boss will start using metal cutter auto attacks as it descends. The mechanics you encounter in this phase depend on the boss's current percentage. If the boss is above 89% (which is unlikely in the Unreal version), it will use a series of metal cutter autos followed by Wave Cannon.
The Wave Cannon targets a single player with a blue marker, and that player should move away from the group to a designated spot, such as the west, where they will be hit by a laser. This laser inflicts a 20-second bleed, and any player who gets clipped by it will also take damage and bleed.
↖ Soar Phase
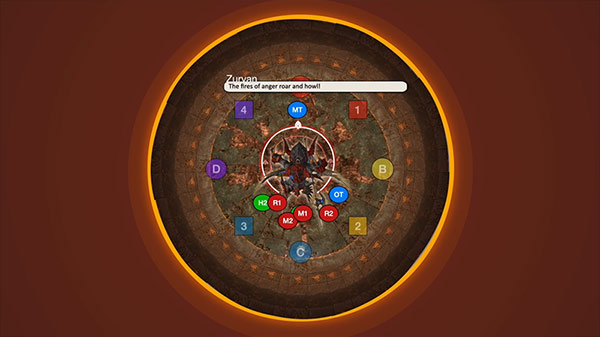
Once you push the boss to 89%, it will enter the Soar phase, indicated by Zurvan saying, "The fires of anger roar and howl." This phase continues until you push the boss below 74%. In the Unreal version, it may be possible to skip this phase entirely with the damage dealt in the first phase, but this depends on the specific fight mechanics. During the Soar phase, the main tank will be hit by three metal cutter auto attacks before the boss dashes off with clones in three directions. There are two patterns to watch out for.
For the first pattern, move away from the group to dodge the AoEs while moving towards your clock position. In this pattern, the bosses will form a triangle, and the AoE pattern they dive with will become visible just before the attack goes off. Tanks and DPS should be in their designated safe spots based on the clock positions, with DPS moving slightly closer to the east-west line.
Healers can position themselves anywhere but should stack with one player. Each tank and DPS will get hit by a giant AoE and should be in their respective safe spots. Healers will receive either a stack or a spread marker, and the group should stack with the healer with the stack marker slightly north of the middle while the other healer moves away from the stack.
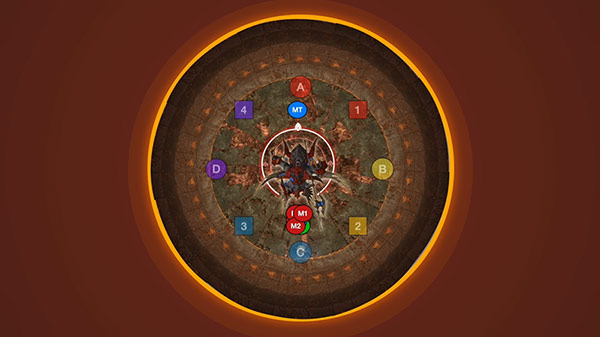
The second pattern is similar, with AoEs going in fixed directions. Squish towards your clock positions, and tanks and DPS should hug the back wall in their section during the last AoE pattern. Tanks and DPS should be guided by the defamations to determine how far they need to go outside the middle players' AoEs. Healers should ensure they are stacked with a DPS or tank only to get hit by one AoE. After dodging the AoEs, stack slightly north of the middle with the player who has the stack marker while the other healer moves away from the middle.
If the boss is pushed below 74%, you will skip the Soar phase. However, if you are still above that threshold, the main tank should use cooldowns and walk through the boss during Demon's Claw. This will place them in the middle because Demon's Claw is a heavy-hitting tank buster that also knocks back the tank. The entire party should stack in front of the tank to mitigate damage from Wave Cannon. Alternatively, the main tank can move through the boss and use an invulnerability FFXIV skill to survive the knockback and subsequent Wave Cannon. Ensure that the closest player to the boss is the off-tank to minimize damage.
↖ Ice Phase
When the boss is pushed below 74%, it will say, "My sorrows chilled, all become ice," marking the start of the Ice phase. The boss will drop an ice puddle beneath it that slows anyone standing in it. Avoid going through the ice puddle. The boss will continue to use metal cutter auto attacks, followed by Biting Halberd.
Before Biting Halberd goes off, have the whole group stack south to prompt the boss to turn in that direction. Once Biting Halberd is cast, everyone should run to the north, moving around the icy circle to avoid being slowed. The safe spot for Biting Halberd may appear smaller than it is, but it covers a perfect 270 degrees.
After Biting Halberd, the boss will cast Southern Cross, creating icy puddles that explode immediately. Wait until the cast finishes and start moving away from the area. The icy puddles persist for a short time and deal heavy damage, so try to bait them together to minimize the risk of getting hit. Following more metal cutter autos, the boss will use one of three mechanics: Out, In, or Biting Halberd. Adjust your positioning accordingly to dodge these mechanics.
↖ Add Phase
After the initial phase, Zurvan will jump away, initiating the add phase. During this phase, there is a limit break bar that needs to be managed. The goal is to kill the adds before the limit break bar reaches 100%. The first wave consists of one Execrated Will and four smaller Execrated Fuses. The tanks should grab the adds and focus on killing them. It's important to note that the Execrated Will hits harder, so ensure that a tank has aggro on it. After a few seconds, the Execrated Will will berserk, increasing its damage output. Focus on grouping the adds together, having a tank take aggro, and eliminating them.
The second wave introduces two Execrated Wills in the west and one Execrated Wit on the right. The Execrated Wit on the right will start casting Mercurial Meteor, which is a powerful ability that needs to be interrupted. Failure to kill the Wit before it casts this ability will result in a wipe.
Additionally, the Execrated Wit will drop small puddles that deal damage over time (DoT). Avoid standing in these puddles. The Execrated Will in the bottom will start casting a gaze mechanic. Players should avoid looking at it until the cast goes off. Group all the adds together and focus on damaging them. There are no cleaves during this phase. Once the gaze mechanic goes off, move all the adds on top of the Execrated Will and defeat them in the order of Wills first, then the Wit.
In the final phase of the adds, three Execrated Fuses will spawn in the east, one Execrated Will in the south, one Execrated Wit in the west (casting Meteor again), and one Execrated Will in the north. Avoid the gaze mechanic from the north add and stack all the enemies on top of the Execrated Wit. Focus on killing the Wits immediately while avoiding the gaze mechanic. Once the gaze goes off, move towards the Execrated Will in the north, dragging all the adds together and defeating them.
After defeating all the adds, Zurvan will prepare for an ultimate attack. Make sure to activate your mitigations before the stun, as there are a few seconds to apply persistent mitigations before being frozen. The boss will dash through the arena, signalling the start of the final phase.
↖ Broken Seal Explained
The focus of the final phase is the mechanic called Broken Seal. At the beginning of this phase, all players will receive either an Infinite Fire or Infinite Ice debuff and will be tethered to a player with the same debuff. If players move too far away from their tethered partner, the tether will turn purple, intensifying the damage over time (DoT) effect. It is crucial to stay close to your partner to avoid death.

The main mechanic of this phase involves three different tower patterns that appear in the arena. With four players having the Fire debuff and four players having the Ice debuff, it is essential to soak the towers with the matching color. Fire players should go to the red towers, while Ice players should go to the blue towers. The challenge lies in ensuring that everyone goes to the correct set of towers and stays close to their partner.
Here's how to handle the tower patterns:
- PlayStation Setup: This pattern looks like the D-pad and face buttons on a PlayStation controller. If you are in the east or west group, it's simple as you are already next to a set of towers. Just move to the set of towers on your side, matching your color. There is no priority system, so it's flexible in terms of who goes where. Make sure to adjust if needed. Halfway through the meteor drop phase, the boss will cast Biting Halberd and face a random player. After soaking the towers, rush behind the boss.
- Inner Tower Setup: This pattern has four towers on the inside. If your group is in the east or west, it's clear who goes where. Move to the set of towers on your side that matches your color. After the towers land, the boss will always cast Tail End, so immediately move to the inner towers and then rush to the outside of the arena, being cautious of the knockback from Tail End.
- Outer Tower Setup: This pattern has towers on the outside. If you are in the east or west, imagine a line that divides the arena perfectly. If there is a tower that matches your color perfectly on your side, go to that tower. If not, head north or south and go to your respective towers. After soaking the outside towers, the boss will cast Cyclical. Please return to the middle and then rush to the towers to soak them.
The tower setups appear randomly, but they follow a fixed order. Once you see one setup, you know the next one, and it always follows the PlayStation Setup, Inner Tower Setup, and Outer Tower Setup order. The mechanics that follow each tower setup are also fixed: PlayStation Setup requires players to get behind the boss, Inner Tower Setup requires players to get out, and Outer Tower Setup requires players to get in.
↖ Final Phase (Chronologically)
Here is a chronological breakdown of the final phase:
- Players receive Infinite Fire and Infinite Ice debuffs, tethered to players with the same debuff.
- One player is targeted with Wave Cannon. They should step aside while others position themselves south of the boss.
- Turfing, a multi-hit tank buster, occurs. Tanks should use cooldowns and avoid standing near others due to the cleave.
- Use the time during Turfing to set up for Broken Seal towers. Tethered players to the main tank move east, while the opposite color pair goes east as well. The remaining players take one step west.
- After Turfing, the boss casts Southern Cross. The main tank moves to join the rest of the group south.
- Broken Seal is cast, and the first set of towers appears. East and West groups should go to the closest set of towers, matching their colors.
- Biting Halberd follows the tower soak. Everyone should immediately get behind the boss.
- Players receive a new set of Infinite Fire and Infinite Ice debuffs. Follow the same tower assignment system as before.
- Repeat the Broken Seal combo: Wave Cannon, Turfing, Southern Cross, and Broken Seal.
- The boss casts Sear. Players should head towards their designated clock spots and dodge the original AoEs. Healers stack slightly north of the middle while the other healer moves away.
- Demon's Claw follows Sear. Drop the stack outside the middle, and the main tank should be closest to the boss to take the greater damage hit.
- Repeat the Broken Seal combo and Sear mechanics until the enrage at around 11.5 minutes.
- The boss starts a slow cast of Flame Halberd, serving as the enrage. Players must defeat the boss before the cast finishes, or a wipe will occur.
Conclusion:
Continue repeating the Broken Seal combo and Sear mechanics until the boss is defeated. Thank you for reading this guide, and feel free to share any additional tips or alternate strategies in the comments.
Most Popular Posts
- FFXIV Endwalker Patch 6.4 Tier List: Meta Placement & Job Rankings
- FFXIV Patch 6.4 Island Sanctuary Rank 16 Rewards: Glamour, Mounts, and New Buildings
- FFXIV Patch 6.4 Update: Level 90 Gear Progression Guide
- Top 10 Epic Samurai Weapons: How to obtain them in FFXIV?
- FFXIV Containment Bay Z1T9: Zurvan (Unreal) Fight Guide
- FFXIV Patch 6.51 New Exquisite Tomestone Weapons Guide
Popular Category Lists
- Path of Exile / (873)
- Diablo IV / (702)
- Runescape / (344)
- New World / (172)
- WoW Classic SoD / (171)
- Guild Wars 2 / (159)
- Elder Scrolls Online / (138)
- FFXIV / (135)
- World of Warcraft / (65)
- WOW Classic / (43)
- Elden Ring / (40)
- Throne and Liberty / (36)
- SWTOR / (35)
- Albion / (35)
- Last Epoch / (32)
- League of Legends / (30)
- Dark and Darker / (28)
- Fallout 76 / (27)
- WotLK Classic / (23)
- Genshin Impact / (22)