0
0
How to efficiently complete the Black Hole Daily Area in SWTOR(2023)?
Welcome to the Black Hole Republic and Imperial Daily Area Guide for SWTOR 2023! In this guide, we'll provide you with the most efficient route and step-by-step instructions on how to complete the daily area of Black Hole. Whether you're a seasoned player looking to make some quick conquest points or a newcomer looking to farm Daily Resource Matrix, this guide will have everything you need to know.
- What is Black Hole?
- Criminal Crackdown
- Eyes and Ears
- Forced Labor
- Counter Eco-Terrorism
- Chasing the Shadow
- Imperial Summary
- Control the Battlefield
- Hypermatter Directive
- The End of Torvix
- Grow
- Final Tips

↖ What is Black Hole?
The black hole is located in the Akrelia region of the galactic map, known as the Dangerous Zone of Corellias Labor Valley, used to process hyper matter. To get to Black Hole, you can either use the Galaxy map or go to the "Solo" tab in your activities window. However, you must have completed the Corellia arc to access this area.
Once you arrive on the Republic side, head to the back of the area, where you'll find two mission terminals. After picking up any remaining missions, you can begin with the quest to recover stolen prototype weaponry while defeating the Torvik forces. Some missions in Black Hole won't trigger until certain objectives are completed, so it's essential to approach this area with a plan. For example, the quest to destroy the Torvic weapons containers will activate once you defeat 15 Torvix forces.
As you progress through the area, follow a clockwise loop to complete objectives, such as destroying the primary objectives, collecting stolen prototype technology, and defeating the Torvix forces. It's essential to stay alert and watch out for enemy patrols, as they can be tough to defeat alone. Use your companions to your advantage and equip them with gear and weapons that can help in battle. Overall, Black Hole is a challenging area to navigate, but with a bit of strategy and preparation, you can successfully complete the daily missions and earn rewards.
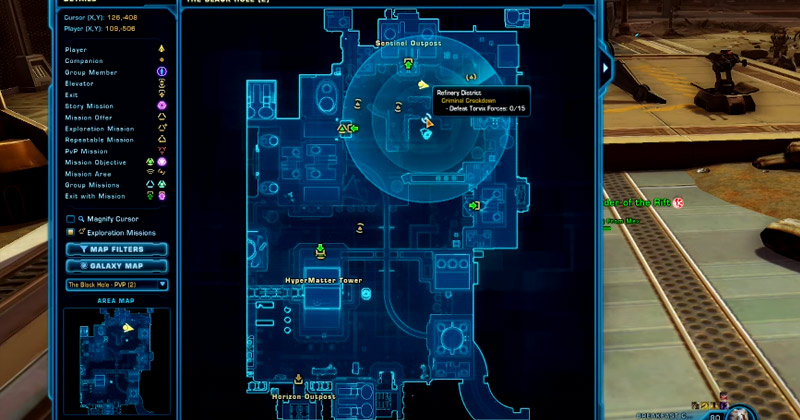
↖ Criminal Crackdown
As you progress through the area, you'll come across a corner where you can farm some enemies. However, if you see other players already there, it's probably not worth competing with them. Keep in mind that defeating 15 Torvix members will unlock the second objective.
If the corner is busy or you're just looking for a change of pace, there are other options. There are enemies and clickable objects scattered around the area. You can drop down the nearby cliff or take the road pathway on the left side. If you need more objectives and the area is still crowded, don't worry. There are more enemies and clickable objects further up the map. Keep in mind that the button to unlock them has a long cooldown, so you may have to wait if someone has recently clicked it.
In summary, there are plenty of options to complete the objectives in this area. Feel free to explore and try different strategies if one area is too busy or not working out.
↖ Eyes and Ears
Let's explore the eyes and ears section together. We want to give you a thorough tour of this area so you can familiarize yourself with all the different parts and how they function. To make the most of this section, stay on top of the detector placements so you can move through it smoothly without having to wait for the next one.
As we move through, We will point out safe spots where you can stand and navigate the area effectively. In this particular section, there are two ways to approach it - we can either move to the corner and adjust our camera angle to click on the item, or we can enter the area and avoid having to manipulate the camera as much.
↖ Forced Labor
To access the Forced Labor section, we'll need to exit the door and head diagonally. As stealth-oriented individuals, we have an advantage in this area, allowing us to sneak past multiple enemy groups. Our objective is to open five holding cells located in this section.
Unfortunately, it is not possible to simply put the enemies to sleep to access the holding cells. However, we can safely open two of the pens by taking out a specific guard nearby. This means we'll need to eliminate the group of enemies guarding the other three holding cells. Once we have successfully opened all five pens, we can proceed to exit the Forced Labor area.
↖ Counter Eco-Terrorism
To navigate this area safely, we need to defeat the first group of enemies and collect the serum that protects us from the harmful effects of the nearby lake. Without the serum, the lake's radiation will cause damage to our health and eventually lead to death. Remember, we can only carry one serum at a time, so any additional serums we encounter will be tracked in our mission logs or inventory.
As we progress through the area, we'll start accumulating radiation poisoning stacks that will cause damage to our health. To prevent this, we need to use the serum to cleanse the stacks. Each serum usage can cleanse up to two stacks, but using it for the third stack will exhaust the serum. There is also a tricky serum spot that is challenging to click on.
If playing with a partner, a useful tip is to run through the tanks together to stay within range of each other and complete all four serums as a team. With these precautions in mind, we can navigate the area safely and prevent harm from the lake's radiation.
↖ Chasing the Shadow
In order to save time as a stealth character, we will be taking on the heroic 2 quests, Chasing the Shadow. By running through and skipping most of the advertisements, the average player could save anywhere from three to 5 minutes. However, you should be aware of the red hyper matter escort droid in the area as they drop the stealth scan.
Another one can be found in the final room, where the security officer needs to be killed as part of the objective. As for the final boss, no specific tips will be provided, but it's important to note that your companion will not walk through the door, so don't attack the boss directly. Instead, run off to the side, and your companion will teleport you to them, allowing you to attack and kill them.
.jpg)
↖ Imperial Summary
To complete the Black Hole on the Imperial side, we need to speak to a person and watch a cut scene before picking up some missions from a back terminal. One of the missions requires us to enter an area and obtain a special mission item to scan for spies. Once close enough to an enemy, the item will either warn us or account for the objective by scanning the person.
After completing this mission, we need to head outside and pick up another mission similar to the one on the Republic side. This time, we need to head right. The suggested route for completing these objectives is to go up and across to Hyper Matter Directive, run back to the end of Torvix for a Heroic 2 mission, quickly travel back to the starting base, and then head down along the bottom to finish the rest. Overall, the Imperial Black Hole missions are more spread out than the Republic side, but with this route, we can efficiently complete all objectives.
↖ Control the Battlefield
The primary objective here is to eliminate a sufficient number of enemies to unlock the next stage of the quest. It may become bothersome if another player is in the area also taking down enemies. In such cases, it's advisable to take a few side paths until you have taken down enough foes. Once you have accomplished this task, the next objective will be available.
Destroying the crates is the focus of the next step, and killing enemies will not yield any further Swtor credits. Therefore, concentrate on destroying the crates as you move toward the next objective.
↖ Hypermatter Directive
In this mission, we will be destroying objects instead of planting listening devices like in the Republic mission. Let's go through the whole area together so you can get a general idea of what to expect. To start, make sure you are right behind the falling objects and keep up your pace. Jump on the first crate to avoid detection, and wait a little bit before moving on to the next object. Be sure to stay far enough back on the crate to avoid detection.
For the next object, there is only one safe place to click from, which is in the back corner. You don't have to jump all the way up onto the coloured piece, but you can do so if it makes you feel safer. Remember to time your click carefully and run out immediately after claiming it.
After finishing the mission, head back outside and turn left to see if you can click on the object again. Then, take a look downstairs for more clickable objects. However, please don't spend too much time searching, as our main objective is to complete the heroic mission.

↖ The End of Torvix
To optimize your time at The End of Torvix, it's highly recommended to have stealth abilities to bypass most of the enemies. Without stealth, this daily area can become quite slow compared to others. Please beware of the detection droids, similar to those on the Republic side, as they can drop a style scan and reveal your presence. There are two such droids in this area, which must be avoided. Additionally, after taking the elevator, be cautious of more stealth detection droids. Clicking on the door won't trigger their detection, so keep that in mind.
Once you reach the room with the console, the stealth portion is complete. Avoid clicking the console multiple times, as it will spawn waves of ads that can be quite difficult to handle. After defeating all the waves of enemies, the Star Destroyer will emerge, and you'll need to defeat it while dodging its attacks.
After that, head over to the three buttons to control them and create a circuit to gas and kill Torvix. To complete the mission, click the buttons in this order: left side console 1, middle console 3, and right side console 2. Finally, click the clickable button to finish the mission. Quickly travel back to the base and continue with the next part of your mission.
Asset Liquidation
As you exit, take a sharp right turn and focus on getting all the clickable objects. If you need any more, there's one behind the droid and another one nearby. Before going inside the phase instant, make sure you can access the second clickable object immediately.
It doesn't matter if another player has already started killing the enemy near the clickable object. As long as you get there in time and hit the enemy together for shared tagging, you'll be able to loot and complete the objective.
↖ Grow
Our objective in this area is to achieve a radiant glow, but we must approach it strategically. We'll want to save this mission for last, as it requires us to navigate through hazardous material on the floor. To protect ourselves, we must obtain a serum that can be acquired by defeating the enemies in the vicinity.
Additionally, there are several buttons that we must click to complete the mission, two of which are guarded by enemies. Once those are taken care of, we'll ascend a ramp and locate the final button to complete the mission. It's worth noting that there is a timer that will start counting down after the last button is clicked, but there's no need to stay in the area or go anywhere specific. Finally, it's important to be cautious when navigating the black hole areas."
↖ Final Tips
If you're looking for a less crowded player-versus-player (PvP) environment in your game, try joining a PvP instance where fewer players compete for resources. You can identify such instances by checking the colour of your nameplate; if it's green, you're in a PvP instance.
However, keep in mind that you may miss out on shared tagging benefits if you're playing solo. Fortunately, PvP instances are generally safe from player attacks, as mission areas don't overlap much. If you're playing a stouter character, consider trying out Osis, Andre, CZ-198, and Ziosset before venturing into the Black Hole, which is a relatively slower area.
Most Popular Posts
- SWTOR Patch 7.3 Tier List & Ranking: High Damage, Surviability and Utility
- 7 Hottest & Most Powerful Solo Class in SWTOR, 2023
- How To Make Millions Of Credits Selling Tech Fragments In SWTOR (2023)?
- Top 5 Simple & Powerful Classes For PVP in SWTOR, 2023?
- How to quickly upgrade the level of the gear to 332 in SWTOR?
- SWTOR Class Story Tier List and Ranking: Worst To Best | 2023
Popular Category Lists
- Path of Exile / (873)
- Diablo IV / (702)
- Runescape / (344)
- New World / (172)
- WoW Classic SoD / (171)
- Guild Wars 2 / (159)
- Elder Scrolls Online / (138)
- FFXIV / (135)
- World of Warcraft / (65)
- WOW Classic / (43)
- Elden Ring / (40)
- Throne and Liberty / (36)
- SWTOR / (35)
- Albion / (35)
- Last Epoch / (32)
- League of Legends / (30)
- Dark and Darker / (28)
- Fallout 76 / (27)
- WotLK Classic / (23)
- Genshin Impact / (22)