0
0
FFXIV 6.3 Endwalker Scholar Guide: How to Master Healing and DPS?
If you're interested in playing the Scholar job in Final Fantasy XIV's latest expansion, Endwalker, you've come to the right place. In this comprehensive guide, we will walk you through the basics of the Scholar job at level 90, covering its role in a raid party, job gauge mechanics, DPS actions, and healing abilities. Whether you're a new player looking to explore the Scholar job or a seasoned healer seeking to optimize your performance, this guide will provide you with valuable insights and strategies.
- About the Job
- Job Gauge
- DPS Action
- Scholar Opener and Rotation
- Maximizing Healing Efficiency
- Healing Actions
- Role Actions

↖ About the Job
The Scholar job is one of two healer spots in a raid party, alongside White Mage, Sage, and Astrologian. Scholars and Sages are barrier healers, meaning they have access to more on-demand shielding spells, whereas White Mages and Astrologians are regen healers, meaning they have access to more powerful healing spells in terms of recovering raw HP. The Scholar job also has a pet companion, the fey, which automatically heals players in the raid and can be ordered to cast powerful raid-wide healing and mitigation abilities.
↖ Job Gauge
The Scholar job has two parts to its gauge: the Aetherflow gauge and the Fey gauge. The Aetherflow gauge tracks the charges of even flow, which can be obtained by using signature abilities and can be spent on powerful mitigation, healing, or damaging abilities. The Fey gauge fills up whenever you use an even flow ability and can be spent on a powerful heal-over-time ability called Etherpact, which has your fey companion tethered to a single target and healing them over time until your Fey gauge is depleted.
↖ DPS Action
Scholars have an easier DPS rotation to compensate for their extra healing responsibilities. The main Global Cooldown (GCD) you'll be casting is called Broil 4, which does damage. You can weave in a singular ability after each cast. This is the main way you will be healing while maintaining full DPS uptime.
You'll also want to keep Bio II applied at all times, starting at four or more targets. Nexus Ruin II is an instant cast GCD that does low damage, which scholars can use to keep DPS uptime whenever they cannot stand still to cast Broil 4. Lastly, Art of War 2 is your AOE spell. It does moderate damage in a circle around you to all enemies within it and becomes worth using over Broil 4, starting at two or more targets.
↖ Scholar Opener and Rotation
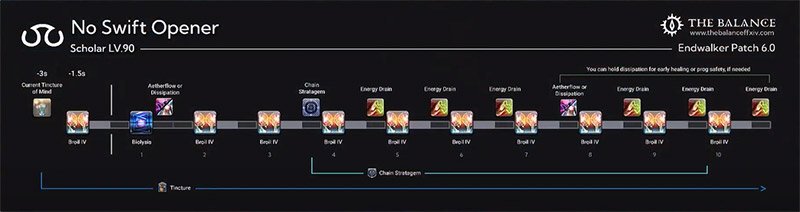
To maximize damage output, the group focuses on the scholar, making the opener critical. The following is a standard opener that can be adjusted based on the healing requirements of the fight. If there is an early raid-wide mechanic, apply shields with Sucker or Adloquium and Deploy. If using Aetherpact on the pull, cast it 3 seconds before pulling. Start by precasting Broil I 1.5 seconds before pulling and instantly applying your damage over time, Bio II.
Weave in either Fae Illumination or Dissipation and cast Broil twice, then use Chain Stratagem after the second Broil cast. Cast Broil three times, weaving in Energy Drain after each of them, then cast Broil once more and weave in either Fae Illumination or Dissipation (whichever was not used on the first ECD). Continue to use Broil and Weave in Energy Drains to spend the remaining Fae Illumination charges. It is recommended to hold on to these charges until ECD and Dissipation come back off cooldown, as this opener uses six charges of Fae Illumination and leaves you dry for them until they return. During progression, hold on to these charges for any moment that you might need to heal.
Remember to keep the Bio II DoT applied at all times and refresh it every 30 seconds before it falls off. Use Swiftcast to cast your next Broil and move for 2.5 seconds instantly, but only if raising is not an issue in the next minute. Lastly, slide casting can be used during the 500-millisecond gap at the end of every cast spell to maintain uptime. If all else fails, use Ruin II while moving.
↖ Maximizing Healing Efficiency
Efficient healing allows for more time spent casting damaging spells. Scholars should minimize their use of gcd heals and instead utilize free ogcd abilities and even flow heals to their fullest extent. Free Healing doesn't cost FFXIV Gil, and contains good abilities limited by cooldowns..
Even flow heals cost even flow charges that could be spent on damaging ogcd Energy Drain, resulting in a loss of 100 potencies whenever a gcd heal is used. Gcd heals take up a broadcast, cost 295 potencies, and consume a lot of extra mana. During progression, however, it is encouraged to use gcd heals for safety reasons.
↖ Healing Actions
As a healer, you have various spells and abilities at your disposal to keep your party members alive. Let's explore each of them in detail.
Firstly, there's the Physic spell, which is a single target heal with a 1.5-second cast time. This spell should only be used as a last resort when you have no mana left, or other heals on cooldown. Another spell to consider is Adlocum, which heals a single target and applies a shield to them after a 2-second cast time. This spell is ideal for spreading a barrier to the entire party before hard-hitting raid wipes or for preparing for incoming damage. The shields applied by Sucker and Adlow are called Galvanize, and they cannot be stacked with each other or with other shields from Sage's abilities.
Apart from these GCD spells, you have access to a plethora of OGCDs. The Ether Flow heals are powerful OGCD heals that cost one charge to use and increase your Fairy Gauge by 10. Lustrate is a single target heal that can be spammed, and Indomitability heals the party for a moderate amount and should be used for burst AoE healing. Sacred Soil creates a sphere that decreases party members' damage taken by 10% and applies a heal over time for 15 seconds. This spell is useful for multi-target damage instances in an encounter, and it is one of the most powerful uses of your Even Flow charges.
- Excoriation: It is a single target heal that only activates when the target's health falls below 50% of their maximum health. It can be used to deal with extended high single-target damage like tank busters.
- Recitation: It modifies the usage of your Even Flow heals and Sucker and Adlow spells. It removes the mana costs of the GCDs and turns the "Even Flow" heals into free-to-use OGCDs instead of being damaged negatively. It also guarantees them to heal critically, vastly increasing their healing potency. This spell is recommended to use alongside "Indomitability" for good AoE healing or with "Excoriation" to help with tank healing.
- Deployment Tactics: It copies your galvanized shield from "Sucker" and "Adlow" and spreads them to everyone near the target. This spell is useful for dealing with high-damage raid wipes and mechanics.
- Protraction: It is a single target buff that increases the target's maximum health and the healing they receive. It is commonly used alongside "Allow" and "Deployment Tactics" to increase the potency of the shield that you spread.
- Expedient: It applies a 10% reduction to all incoming damage for 20 seconds and grants a movement speed buff for 10 seconds to all nearby party members. It is equal to "Sprint" and can be used to deal with mechanics that require movement.
↖ Role Actions
As a Scholar in Final Fantasy XIV, you have access to a range of powerful healer role actions to support your party. One of the most crucial of these is resurrection, which can be a real lifesaver in tough battles. However, it's important to note that this spell uses up a large amount of mana and has a long eight-second cast time. To mitigate this, you can use Swiftcast to make the spell instant, allowing you to get your party member back on their feet much more quickly.

Another useful role action for Scholars is Asuna, which can remove one random cleansable debuff from a party member. Keep an eye out for these debuffs, which are marked with a blue line above their icon. Lucid Dreaming is also an important ability, as it applies a mana-restoring buff over its duration. Using this spell regularly will help you maintain your mana levels throughout a fight, so be sure to use it whenever your mana dips below 80%.
Surecast is a valuable tool for Scholars, providing knockback immunity and preventing your spellcast from being interrupted. This can be a real lifesaver in battles with a lot of enemy attacks or environmental hazards. Finally, Rescue allows you to pull one party member towards you, which can be useful for saving a teammate who's in the wrong place for a mechanic. However, be careful when using this ability, as it can sometimes do more harm than good if you need more confidence in its usage.
Conclusion:
Overall, this guide serves as a valuable resource for players interested in mastering the Scholar job in Final Fantasy XIV's Endwalker expansion. It provides insights, strategies, and recommendations for both healing and DPS aspects, helping players optimize their performance and contribute effectively to raid parties.
Most Popular Posts
- FFXIV Endwalker Patch 6.4 Tier List: Meta Placement & Job Rankings
- FFXIV Patch 6.4 Island Sanctuary Rank 16 Rewards: Glamour, Mounts, and New Buildings
- FFXIV Patch 6.4 Update: Level 90 Gear Progression Guide
- Top 10 Epic Samurai Weapons: How to obtain them in FFXIV?
- FFXIV Containment Bay Z1T9: Zurvan (Unreal) Fight Guide
- FFXIV Patch 6.51 New Exquisite Tomestone Weapons Guide
Popular Category Lists
- Path of Exile / (873)
- Diablo IV / (702)
- Runescape / (344)
- New World / (172)
- WoW Classic SoD / (171)
- Guild Wars 2 / (159)
- Elder Scrolls Online / (138)
- FFXIV / (135)
- World of Warcraft / (65)
- WOW Classic / (43)
- Elden Ring / (40)
- Throne and Liberty / (36)
- SWTOR / (35)
- Albion / (35)
- Last Epoch / (32)
- League of Legends / (30)
- Dark and Darker / (28)
- Fallout 76 / (27)
- WotLK Classic / (23)
- Genshin Impact / (22)